1) We have a typical Web Intelligence report here and we're viewing it's location in Infoview so we can run it here.

2) Let's run it, no prompt or anything like that, plain and simple.

3) Let's go to Central Management Console (CMC) and schedule this report to be emailed to a user.

4) Move onto "Schedule" tab.

5) Let's set it to Microsoft Excel format, i.e. Schedule this report to be delivered / emailed in MS Excel format.

6) Destination 1: Now we need to up the Destination for this to be scheduled report. In this case, we'll be Emailing this report. From the drop down menu, select "Email (SMTP)". Then click on the radio button next to the "Set the values to be used at schedule time here:" .
Enter an email address to be sent "From" and email address(es) to be sent "To", along with CCs if any.

7) Destination 2 - Go / scroll down a bit. In the "Subject" - we'll select "Title" from the drop down menu next to where it says "Add a placeholder for a variable property"and simply "Add" it so that the recipient(s) can see the Title of the report as their Subject line. You can select any of the other available properties like ID, Owner, Datetime, User Full Name, Email Address. I will also check the box for "Attach object instance to email message", so that a copy of the report is also attached to the recipients emails. I mean, what's the point of emailing from Business Objects users, if there are no attachments right?

8) Let's click on "Schedule" once more and we'll just do a one time schedule to run now. You can of course, and will most likely will have to schedule as per the user requirements, be it daily, weekly, monthly or based a some specific dates selected in a custom Calendar (I'll try to create a mini tutorial on how to schedule repors using Calendars, someday; it's pretty easy).

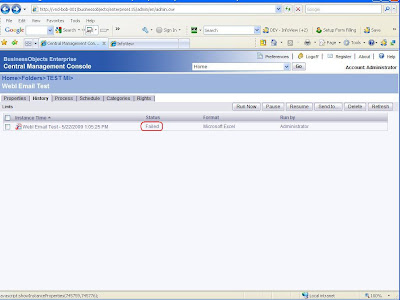
9) So it's "Pending", sometimes you may see "Pending" or the status just may show as "Running".

10) Since it took only 10 seconds, by the time I hit "Refresh" the report already "Failed" and thus I couldn't see the "Running" status.

11) Upon clicking on "Failed", we see the error at the bottom that says, "Error Message: destination DLL disabled. CrystalEnterprise.Smtp:" .

12) That basically means that the Email (SMTP) is not enabled for the appropriate job server; in this case, Web Intelligence Job Server(s) because we are scheduling a WebI report to be emailed. Let's go to "Servers" and enable the EMAIL destination for the available Web Intelligence Job Servers.

13) Go to the "Destinations" tab and we see, Email (SMTP) is RED flagged - i.e. disabled. Go ahead, click on the box left of it and hit "Enable".

14) Now click on "Email (SMTP)" and set up the email properties, including Domain, Server, From, To and any other properties - you'll want to consult with one of you system admins / analyts at this stage.

15) Scroll down and add the Title as the Subject also select "Attach object instance to email message" -- this will be the default behavior for all outgoing emails using this Web Intelligence Job Server.
*** Remember, if you have multiple WebI Job Servers, you'll have to enable all of their Email (SMTP) from the Destinations tab just like above.

16) Let's go back to the report in CMC.

17) And we will reschedule it once more.

18) There's our initial "Failed" one and right below it, is our "Pending" current report.

19) And success! This is the actual email and the attached report in Excel Format. Look at the subject, it says "WebI Email Test" -- and that's the title of this report.

So, there you go. That was a walk through of how to set up the Email feature in Business Objects Enterprise XIR2 so that reports can be scheduled and report instances can be emailed out to recipients.

Thanks a lot.. The article is very useful...
ReplyDeleteCool Article..Appriciate
ReplyDeleteThank you, its great explanation with detail screenshots
ReplyDeleteVery good article with detailed screenshots.i have one question here..i would like to send URL to my users after scheduling the report.automatically users has to receive URL, once scheduling is complete..once user clicks on url, report should open..is there any feature like that??
ReplyDeletereally many thanks,for such a nice explanation.
ReplyDeletePlease keep posting such articles.
Hello,
ReplyDeleteWhat if you want to pull the results for the previous day? How can I set up a query so every time the report runs the previous days data is displayed? At the moment the report has a prompt for the date but I want it to automatically pick yesterday?
Great article. Can this be setup that the emails be queued for instance where the smtp server is temporarily unavailable?
ReplyDeleteIs it possible to insert the report into the email? I have a small report I'm sending (3 columns by 7 rows) that I would like inserted in the email, so end users don't have to open an attachment. If anyone knows how to do this, would love to hear about it.
ReplyDeleteHi, very nice description. You wrote "(I'll try to create a mini tutorial on how to schedule repors using Calendars, someday; it's pretty easy)." -> I would like to read that :). Thanks a lot.
ReplyDeleteThanks for the information. I have one question. While scheduling the report I can give any email address in the from address and the mail still goes out. Is it possible to restrict it to one unique address or prevent user from entering that.
ReplyDelete